
Computer Numerical Control
Computer numerical control (CNC) is the
numerical control system in which a
dedicated computer is built into the
control to perform basic and advanced
NC functions. CNC controls are also referred to as soft wired
NC systems because most of their
control functions are implemented by the
control software programs. CNC is a computer assisted process to
control general purpose machines from
instructions generated by a processor
and stored in a memory system.
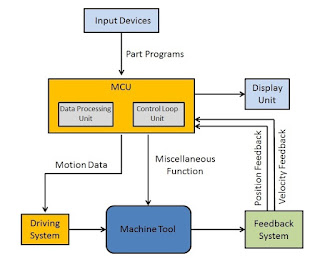
Elements of a CNC System:
A CNC system consist of the following 6 major elements:
- Input Device
- Machine Control Unit
- Machine Tool
- Driving System
- Feedback Devices
- Display Unit
Key Areas of Knowledge:
As with any subject, the more time you invest in learning about CNC and the
related technologies, the more you will get from it. To achieve the best results,
there are a few key areas which you should concentrate on:
 Computer skills
One requirement common to all aspects of CNC work is how to use a
computer to perform basic tasks. You will be working with computers and
computer programs during almost all the steps of the process as you
design your parts and need to understand basic operations such as starting
and stopping programs, saving, copying and deleting files, finding files
stored on your computer and installing programs and updates.
Your CNC machine is also run by a computer, this may be a standalone
PC or a dedicated Control Box.
This guide will assume a basic knowledge of computers and the Windows
operating system, if you don’t feel comfortable with your current
computer skills or are new to running a PC then it would be well worth
taking a basic course or buying a general guide to working with your PC.
Computer skills
One requirement common to all aspects of CNC work is how to use a
computer to perform basic tasks. You will be working with computers and
computer programs during almost all the steps of the process as you
design your parts and need to understand basic operations such as starting
and stopping programs, saving, copying and deleting files, finding files
stored on your computer and installing programs and updates.
Your CNC machine is also run by a computer, this may be a standalone
PC or a dedicated Control Box.
This guide will assume a basic knowledge of computers and the Windows
operating system, if you don’t feel comfortable with your current
computer skills or are new to running a PC then it would be well worth
taking a basic course or buying a general guide to working with your PC. 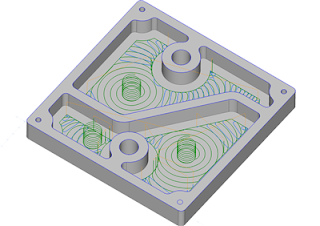
Design & Tool path Software
Before you can cut anything with a CNC, you need to first create the
design layout that the machine is going to follow to cut the parts. The
software you choose will play a significant role in successfully creating
projects with your CNC. Simply put, the design software will allow you to
transform “pencil and paper” ideas to a set of instructions used to run the
machine. When done correctly, the end result will be a physical product
you can touch and hold that has value and purpose and a great sense of
achievement.
Operating and Maintaining your CNC Machine
If you currently own or use a CNC machine, you already know how
important it is to keep it properly maintained and adjusted, to know and
understand its limitations and how to set it up correctly to run a job.
If you don’t own a machine yet, then it’s important to spend time thinking
about what you want your machine to be able to produce, this can
eliminate a lot of future frustration. Cost will always be an important
factor, but realize that you need to balance that with capabilities, because
nothing can be more expensive than a machine that cannot do what you
need. For example, if you want to cut large sheet goods then a desktop
model will probably not be your best choice. However, if you only have
room for a small machine this may be your only option and you need to
understand its limitations on how large a part it can cut. Only you can
determine what this balance will be for your situation and budget.
Some important considerations when researching the purchase of a
machine or when looking at building one yourself include size, speed and
accuracy and the technical support offered both before and after the
purchase. As with software, the importance of a company’s reputation,
support, and an active website and/or forum cannot be understated.
Every CNC machine needs software to directly drive its movement; this is
commonly referred to as the ‘Control Software’. Some common generic
third-party packages that do this include “Mach3” and “WINCNC”. Many
manufactures create and use their own proprietary systems specific to their
own models and these may be installed on an external PC or be loaded
onto a dedicated Control Box attached to the machine.
Most control systems offer settings that can significantly improve the
smoothness and accuracy of your machine when correctly set. While this
goes beyond the scope of this guide, it is something worth investigating
for your particular CNC. Remember, the best designed project will not cut
well on an incorrectly “tuned” machine.
Knowledge of Materials and Tooling
When it comes to obtaining the best possible results, you cannot forget the
material you are working with or the tool you are using to cut it. The type
of material will factor into every stage of the Project – from initial concept
through final finishing.
The common materials people using CNC Routers work with include;
wood, plastics, dense foam board and softer (non-ferrous) metals (brass,
aluminum, etc.). If you are not already familiar with the type of material
you want to use, there are many sources of information that can help you.
Typical questions you must answer for the type of material include proper
tool (bit) selection, how fast you can move that tool through that material
(Feed Rate and Plunge Rate), how much material you can remove at one
time (Pass Depth and Cut Depth) and how fast the bit should be rotating
(Spindle or Router speed). Typically suppliers of tooling offer information
on the correct settings for the router bits they sell.

Workflow Overview of a typical CNC project:
When you step back and look at a complete project from start to finish, you can
identify a series of major steps that will form the “Workflow” to complete it.
Having a good understanding of this process will help you start to appreciate
where the different software packages and setup procedures fit into the overall
creation of parts with your CNC.
Concept
This is the idea for what you are going to make. This may range
from a specific customer requirement, something you have
sketched on a napkin or a ready to go file that someone has
already prepared. At this stage you need to try and think through
the other processes in the job to help to get the best approach to
achieving it. You should also assemble any reference material
you will use to help design the part such as photos, data from the
customer, design sketches etc.
Design (CAD – Computer Aided Design)
For the design you need create the computer
data that will define either the 2D or 3D forms
you want to cut on your CNC. This is done in
what is typically called “CAD software” and
you may also hear this type of software
referred to as a drafting, drawing or design
program.
The finish point of the Design stage is to have
prepared all the 2D data (Vectors) or 3D data
(Components) you require to start calculating
the specific movements the CNC machine will follow, these moves are typically
referred to as the “Toolpaths”.
Most of our customers use one of the Vectric
products (VCarve Pro or Aspire) to do their
design although there are many other design
(CAD) programs available for either 2D
drawing or 3D modeling and depending on
the file format export options available, this
data can be saved and imported into the
Vectric programs for Too path creation.
Toolpaths (CAM – Computer Aided Manufacturing)
Once the design is complete, you
will start to calculate the actual
paths that will drive where the tool
will move on the machine, as
previously stated these are called
“Toolpaths”. Creating your
Toolpaths is the key stage in going
from the virtual world of a
computer design to the reality of the
physical world. At this point you
will start to take into account the
shape and size of the tool, the type
of movement you want the tool to
make (the shape you want it to
leave in the material) and
appropriate settings for how fast the
tool can be moved and how much material can be removed safely.
Once the Toolpaths have been calculated the software will let you Preview how
they will look in a virtual piece of material. This lets you check that they are
doing what you expected. Once you are happy the Toolpaths are correct then they
can be saved in a format that is appropriate for your particular CNC.
Machining
Once your tool paths have been saved then
you transfer them over to the CNC. At this
stage you need to set the CNC to match
the job setup you specified in the
Design/Machining software. This will
involve setting up your material in the
right orientation, and making sure it will
be secure while you’re cutting it. Then
you need to load the correct tool and tell
the machine where the X, Y and Z
reference position is for the tool tip
(normally this is the zero position for each
axis), again this will be to replicate how it
was set in the software so all the positions
and sizes you specified in the software will be replicated at the machine.
Finish and Assembly are obviously going to vary dramatically depending on the
type of job you are doing and the material you are cutting. We will not cover this
in detail in this document but it is important to be aware of the finish you plan to
use and where applicable use appropriate options in the software or on the
machine to help minimize or aid with your finishing process.
Applications of CNC machine: CNC machine I are widely used in the metal cutting industry and the best used to produce the following types of products:
- Parts with complicated contours.
- Parts requiring close tolerance and or good repeat-ability.
- Parts requiring expensive Jigs And Fixtures if produce on conventional machines.
- Parts that may have several engineering changes such as during the development stage of a prototype.
- In case where human error could be extremely costly.
- Parts that are needed in a hurry.
- A small batch lot or short production runs.
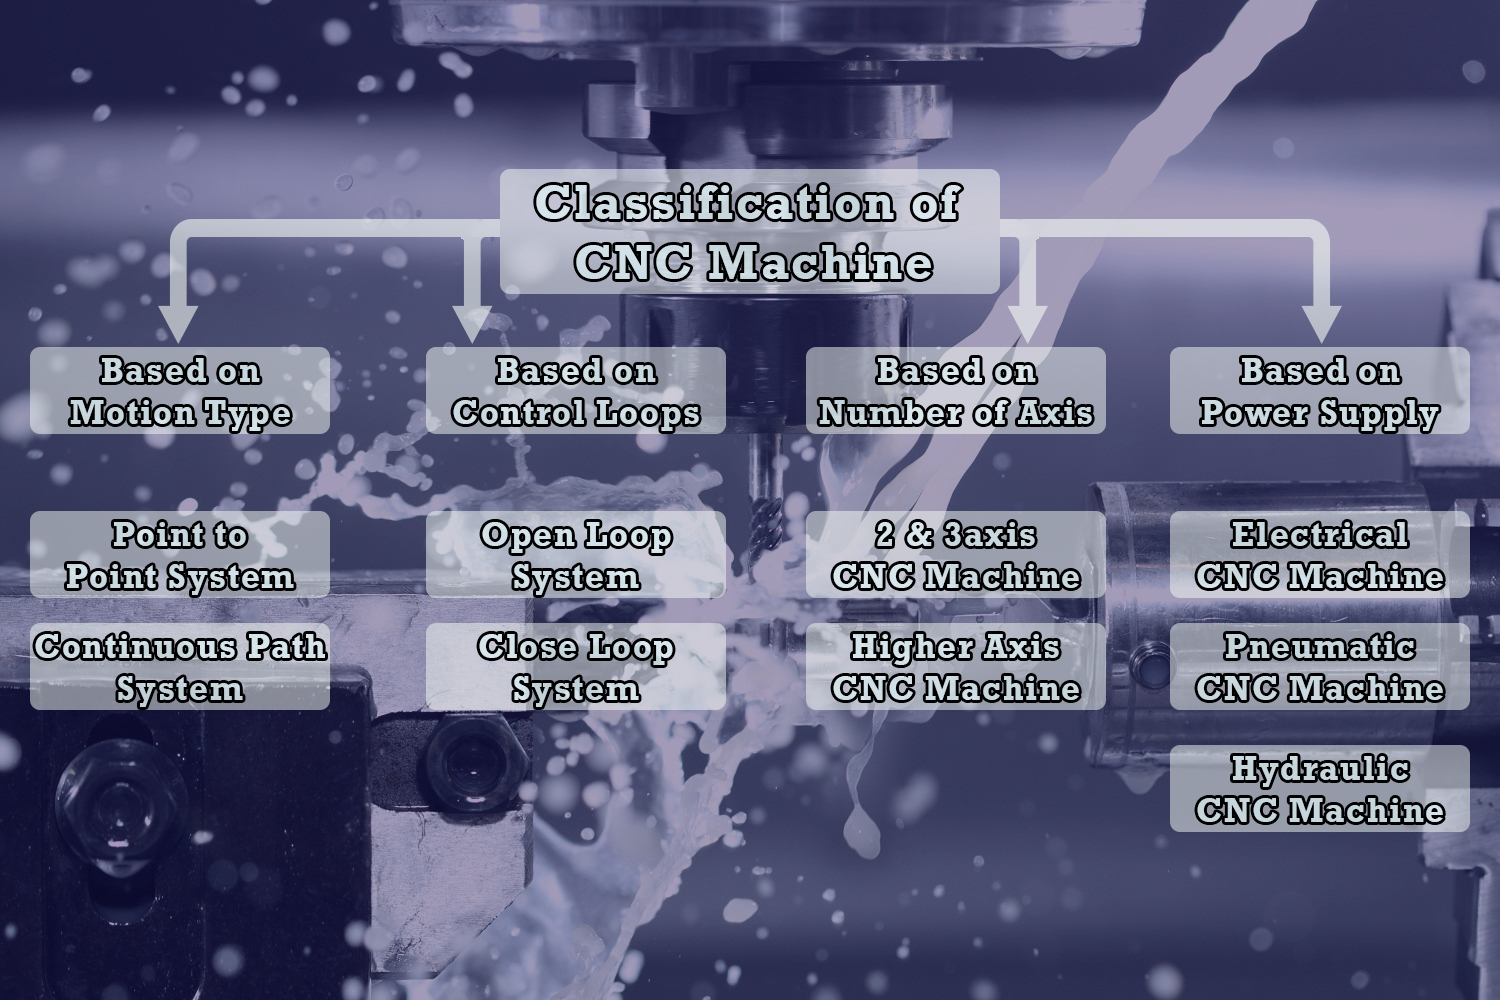
Classification of CNC Machine: